Tuesday, September 22, 2020

Exploring Monster Taming Mechanics In Final Fantasy XIII-2: Data Collection

The monster taming aspect of Final Fantasy XIII-2 is surprisingly deep and complex, so much so that I'm interested in exploring it in this miniseries by shoving the monster taming data into a database and viewing and analyzing it with a website made in Ruby on Rails. In the last article, we learned what monster taming is all about and what kind of data we would want in the database, basically roughing out the database design. Before we can populate the database and start building the website around it, we need to get that data into a form that's easy to import, so that's what we'll do today.

Starting a Data Parsing Script

We already identified a good source for most of the data we want to use from the Monster Infusion FAQ post on Gamefaqs.com. However, we don't want to type the thousands of lines of data from this FAQ into our database because we would be introducing human error with the data copying, and the writers of this FAQ have already gone through all of the trouble of entering the data the first time, hopefully without mistakes. Besides, why would we go through such a tedious process when we could have fun writing a script to do the work for us? Come on, we're programmers! Let's write this script.

Since the website will eventually be in Ruby on Rails, we might as well write this script in Ruby, too. It's not absolutely necessary to write the script in Ruby because it's a one-off deal that will only be run once (when it works) to convert the text file into a format that we can easily import into a database, but Ruby is pretty darn good at text processing, so let's stick with it. I like writing scripts in stages, breaking things down into simple problems and starting with an easy first step, so let's do that here. The simplest thing we can do is read in the text file after saving the FAQ to a local file. To add a bit of debug to make sure we have the file read in, let's scan through and print out the section header for the data we're looking for in the file:
File.foreach("ffiii2_monster_taming_faq.txt") do |line|
if line.include? "MLTameV"
puts line
end
end
Already, this code gives the basic structure of what we're trying to do. We're going to read in the file, loop through every line, look for certain patterns, and output what we find that matches those patterns. The real deal will be much more complex, but it's always good to have a working starting point.

This code also has a few problems that we may or may not want to do anything about. First, it's just hanging out in the middle of nowhere. It's not in a class or function or anything more structured. If this was going to be a reusable parsing tool for converting various FAQs into rows of data, I would definitely want to engineer this code more robustly. But hey, this is a one-off script, and it doesn't need all of that extra support to make it reusable. Over engineering is just a waste of time so we'll leave this code out in the open.

Second, I've got two constant strings hard-coded in those lines: the file name and the search string. I may want to stick the search string in a variable because it's not terribly obvious what "MLTameV" means. The file name, on the other hand, doesn't need to be in a variable. I plan to keep this part of the code quite simple, and it's the obvious loop where the file is read in. On top of that, this code will be very specific to handling this exact file, so I want the file name to be tightly coupled to this loop. If the script is ever copied and modified to work on a different file, this file name string can be changed in this one place to point to the new file that that script works with. I don't see a need to complicate this code with a variable.

Third, when this code runs, it prints out two lines instead of one because there's another instance of "MLTameV" in the table of contents of the file. For locating the place to start parsing monster data, we want the second instance of this string. One way to accomplish this task is with the following code:
SECTION_TAG = "MLTameV"
section_tag_found = false

File.foreach("ffiii2_monster_taming_faq.txt") do |line|
if section_tag_found and line.include? SECTION_TAG
puts line
elsif line.include? SECTION_TAG
section_tag_found = true
end
end
Now only the section header line is printed when this script is run. However, as what inevitably happens when we add more code, we've introduced a new problem. It may not be obvious right now, but the path that we're on with the section_tag_found variable is not sustainable. This variable is a piece of state that notifies the code when we've seen a particular pattern in the text file so we can do something different afterward. When parsing a text file using state variables like this one, we'll end up needing a lot of state variables, and it gets unmanageable and unreadable fast. What we are going to need instead, to keep track of what we need to do next, is a state machine.

Parsing Text with a Finite State Machine

Finite state machines (FSM) are great for keeping track of where you are in a process and knowing which state to go to next, like we need to know in the case of finding the section header for the list of tamable monsters in this text file. In the FSM we always have a current state that is one of a finite number of states, hence the name. Depending on the input in that state, the FSM will advance to a next state and possibly perform some output task. Here is what that process looks like in Ruby for finding the second section tag:
SECTION_TAG = "MLTameV"

section_tag_found = lambda do |line|
if line.include? SECTION_TAG
puts line
end
return section_tag_found
end

start = lambda do |line|
if line.include? SECTION_TAG
return section_tag_found
end
return start
end

next_state = start
File.foreach("ffiii2_monster_taming_faq.txt") do |line|
next_state = next_state.(line)
end
First, the states are defined as lambda methods so that they can easily be passed around as variables, but still called as functions. These variables have to be declared before they're used, so the section_tag_found method either has to be defined first because the start method uses it, or all methods could be predefined at the start of the file and then redefined with their method bodies in any desired order. Another way to define these states would be to wrap the whole thing in a class so that the states are class members, but that kind of design would be more warranted if this FSM was part of a larger system. As it is, this parser will be almost entirely made up of this FSM, so we don't need to complicate things.

We can also represent this FSM with a diagram:


The FSM starts in the Start state, obviously, and it transitions to the Section Tag Found state when there's a matching SECTION_TAG. The unlabeled lines pointing back to the same states mean that for any other condition, the state remains unchanged. This diagram is quite simple, but when the FSM gets more complex, it will definitely help understanding to see it drawn out.

Notice that running through the lines of the text file in the foreach loop became super simple. All that's necessary is to feed each line into the next_state, and assign the return value as the new next_state. The current state is kind of hidden because we're assigning the next_state to itself. Also notice that we need to be careful to always return a valid state in each path of each state method, even if it's the same state that we're currently in. Inadvertently returning something that was not a valid state would be bad, as the FSM is going to immediately try to call it on the next line.

Now that we have an FSM started, it'll be easy to add more states and start working our way through the tamable monster data. What do we need to look for next? Well, we can take a look at the data for one monster and see if there are any defining characteristics:
...............................................................................

MONSTER 001

Name---------: Apkallu Minimum Base HP------: 1,877
Role---------: Commando Maximum Base HP------: 2,075
Location-----: Academia 500 AF Minimum Base Strength: 99
Max Level----: 45 Maximum Base Strength: 101
Speed--------: 75 Minimum Base Magic---: 60
Tame Rate----: 10% Maximum Base Magic---: 62
Growth-------: Standard
Immune-------: N/A
Resistant----: N/A
Halved-------: All Ailments
Weak---------: Fire, Lightning
Constellation: Sahagin

Feral Link-----: Abyssal Breath
Description----: Inflicts long-lasting status ailments on target and nearby
opponents.
Type-----------: Magic
Effect---------: 5 Hits, Deprotect, Deshell, Wound
Damage Modifier: 1.8
Charge Time----: 1:48
PS3 Combo------: Square
Xbox 360 Combo-: X

Default Passive: Attack: ATB Charge
Default Skill--: Attack
Default Skill--: Ruin
Default Skill--: Area Sweep
Lv. 05 Skill---: Powerchain
Lv. 12 Passive-: Strength +16%
Lv. 18 Skill---: Slow Chaser
Lv. 21 Skill---: Scourge
Lv. 27 Passive-: Strength +20%
Lv. 35 Passive-: Resist Dispel +10%
Lv. 41 Passive-: Strength +25%
Lv. 42 Passive-: Resist Dispel +44%
Lv. 45 Skill---: Ruinga

Special Notes: Apkallu only spawns twice in Academia 500 AF. If you fail to
acquire its Crystal in both encounters, you will have to close
the Time Gate and replay the area again.

...............................................................................
That series of dots at the beginning looks like a good thing to search for. It repeats at the start of every monster, so it's a good marker for going into a monster state. We'll also want to pass in a data structure that will be used to accumulate all of this monster data that we're going to find. To make it easy to export to a .csv file at the end, we're going to make this data structure an array of hashes, and it looks like this with the new state:
SECTION_TAG = "MLTameV"
MONSTER_SEPARATOR = "........................................"

new_monster = lambda do |line, data|
if line.include? MONSTER_SEPARATOR
return new_monster, data << {}
end
return new_monster, data
end

section_tag_found = lambda do |line, data|
if line.include? SECTION_TAG
return new_monster, data
end
return section_tag_found, data
end

start = lambda do |line, data|
if line.include? SECTION_TAG
return section_tag_found, data
end
return start, data
end

next_state = start
data = []
File.foreach("ffiii2_monster_taming_faq.txt") do |line|
next_state, data = next_state.(line, data)
end

puts data.length
I shortened the MONSTER_SEPARATOR pattern in case there were some separators that were shorter than the first one, but it should still be plenty long to catch all of the instances of separators between monsters in the file. Notice that we now have to pass the data array into and out of each state method so that we can accumulate the monster data in it. Right now it simply appends an empty hash for each monster it finds. We'll add to those hashes in a bit. At the end of the script, I print out the number of monsters found, which we expect to be 164, and it turns out to be a whopping 359! That's because that same separator is used more after the tamable monster section of the file, and we didn't stop at the end of the section. That should be easy enough to fix:
SECTION_TAG = "MLTameV"
MONSTER_SEPARATOR = "........................................"
NEXT_SECTION_TAG = "SpecMon"

end_monsters = lambda do |line, data|
return end_monsters, data
end

new_monster = lambda do |line, data|
if line.include? MONSTER_SEPARATOR
return new_monster, data << {}
elsif line.include? NEXT_SECTION_TAG
return end_monsters, data
end
return new_monster, data
end

# ...
I added another state end_monsters that consumes every line to the end of the file, and we enter that state from the new_monster state if we see the NEXT_SECTION_TAG. Now if we run the script again, we get a count of 166 monsters. Close, but still not right. The problem is that there are a couple extra separator lines used in the tamable monster section, one after the last monster and one extra separator after a sub-heading for DLC monsters. We're going to have to get a bit more creative with how we detect a new monster. If we look back at the example of the first monster, we see that after the separator the next text is MONSTER 001. This title for each monster is consistent for all of the monsters, with MONSTER followed by a three digit number. Even the DLC monsters have this tag with DLC in front of it. This pattern is perfect for matching on a regular expression (regex).

Finding Monster Data with Regular Expressions

A regex is a text pattern defined with special symbols that mean various things like "this character is repeated one or more times" or "any of these characters" or "this character is a digit." This pattern can be used to search a string of text, which is called matching the regex. In Ruby a regex pattern is denoted by wrapping it in forward slashes (/), and we can easily define a regex for our MONSTER 001 pattern:
SECTION_TAG = "MLTameV"
MONSTER_SEPARATOR = "........................................"
NEXT_SECTION_TAG = "SpecMon"
NEW_MONSTER_REGEX = /MONSTER\s\d{3}/

find_separator = nil

end_monsters = lambda do |line, data|
return end_monsters, data
end

new_monster = lambda do |line, data|
if NEW_MONSTER_REGEX =~ line
return find_separator, data << {}
elsif line.include? NEXT_SECTION_TAG
return end_monsters, data
end
return new_monster, data
end

find_separator = lambda do |line, data|
if line.include? MONSTER_SEPARATOR
return new_monster, data
end
return find_separator, data
end

# ...
The NEW_MONSTER_REGEX is defined as the characters MONSTER, followed by a space (\s), followed by three digits (\d). I changed the new_monster state to look for a match on our new regex, and added a find_separator state to still search for the MONSTER_SEPARATOR. Notice that the FSM will bounce between these two states, so the state that's defined later has to be declared at the top of the file, otherwise Ruby will complain that find_separator is undefined in new_monster.

These regex patterns are useful and powerful, but they can also be quite tricky to get right, especially when they get long and complicated. We'll be using them to pull out all of the data we want from each monster, but we'll try to keep them as simple as possible. The next regex is more complicated, but it will allow us to pull nearly all of the properties for each monster and put it into the empty hash that was added to the list of hashes for that monster. Ready? Here it is:
MONSTER_PROP_REGEX = /(\w[\w\s\.]*\w)-*:\s(\S+(?:\s\S+)*)/
We'll break this regex apart and figure out what each piece means separately.

The first part of the regex, (\w[\w\s\.]*\w), is surrounded by parentheses and is called a capture. A capture will match on whatever the pattern is inside the parentheses and save that matching text so that it can be accessed later. We'll see how that works in the code a little later, but right now we just need to know that this is how we're going to separate out the property name and its value from the full matching text. This particular capture is the property name, and it starts with a letter or number, symbolized with \w. The stuff in the brackets means that the next character can be a letter or number, a space, or a period. Any of those characters will match. Then the following '*' means that a string of zero or more of the preceding character will match. Finally, the property name must end with a letter or number, symbolized with \w again. The reason this pattern can't just be a string of letters and numbers is because some of the property names are multiple words, and the "Lv. 05 Skill" type properties also have periods in them. We want to match on all of those possibilities.

The next part of the regex is -*:\s, which simply means it will match on zero or more '-', followed by a ':', followed by a space. Reviewing the different lines for the MONSTER 001 example above, we can see that this pattern is indeed what happens. Some cases have multiple dashes after the property name, while others are immediately followed by a colon. The colon is always immediately followed by a single space, so this should work well as our name-value separator. It's also outside of any parentheses because we don't want to save it for later.

The last part of the regex is another capture for the property value: (\S+(?:\s\S+)*). The \S+—note the capital S—will match on one or more characters that are not white space. It's the inverse of \s. The next thing in this regex looks like yet another capture, but it has this special '?:' after the open parenthesis. This special pattern is called a grouping. It allows us to put a repeat pattern after the grouping, like the '*' in this case, so that it will match on zero or more of the entire grouping. It will not save it for later, though. Since this grouping is a space followed by one or more non-space characters, this pattern will match on zero or more words, including special characters. If we look at the example monster above, we see that this pattern is exactly what we want for most of the property values. Special characters are strewn throughout, and it would be too much trouble to enumerate them all without risking missing some so we cover our bases this way.

Fairly simple, really. We're going to match on a property name made up of one or more words, followed by a dash-colon separator, and ending with a property value made up of one or more words potentially including a mess of special characters. Note how we couldn't have used the \S character for the property name because it would have also matched on and consumed the dash-colon separator. We also could not have used the [\s\S]* style pattern for the words in the property value because it would have matched on any number of spaces between words. That wouldn't work for the first few lines of the monster properties because there are two name-value pairs on those lines. Now that we have our regex, how do we use those captured names and values, and how exactly is this going to work for the lines with two pairs of properties on them? Here's what the new add_property state looks like with some additional context:
# ...

MONSTER_PROP_REGEX = /(\w[\w\s\.]*\w)-*:\s(\S+(?:\s\S+)*)/

find_separator = nil
new_monster = nil

end_monsters = lambda do |line, data|
return end_monsters, data
end

add_property = lambda do |line, data|
props = line.scan(MONSTER_PROP_REGEX)
props.each { |prop| data.last[prop[0]] = prop[1] }
return new_monster, data if line.include? MONSTER_SEPARATOR
return add_property, data
end

new_monster = lambda do |line, data|
if NEW_MONSTER_REGEX =~ line
return add_property, data << {}
elsif line.include? NEXT_SECTION_TAG
return end_monsters, data
end
return new_monster, data
end

# ...
The double-property lines are handled with a different type of regex matcher, line.scan(MONSTER_PROP_REGEX). This scan returns an array of all of the substrings that matched the given regex in the string that it was called on. Conveniently, if the regex contains captures, the array elements are themselves arrays of each of the captures. For example, the scan of the first property line of our MONSTER 001 results in this array:
[['Name', 'Apkallu'],['Minimum Base HP', '1,877']]
We can simply loop through this array, adding property name and property value to the last hash in the list of hashes. Then, if the line was actually the MONSTER_SEPARATOR string, it didn't match any properties and we'll move on to the next monster. Otherwise, we stay in the add_property state for the next line.

This process works really well until we get to the "Default Passive" and "Default Skill" properties, because there can be multiple instances of those. In this case, we need to append a number to each of these properties, such as "Default Passive1", "Default Passive2", etc., to differentiate them so later instances don't overwrite earlier instances of each property. We can do this by modifying the props.each line to check for these default properties and append an incrementing number to their names:
  props.each do |prop|
if prop[0] == 'Default Passive' || prop[0] == 'Default Skill'
n = 1
n += 1 while data.last.has_key? (prop[0] + n.to_s)
prop[0] += n.to_s
end
data.last[prop[0]] = prop[1]
end
This fix takes care of multiple instances of the same property, but one last thing that we're not handling is those multi-line descriptions and special notes. We need to append those lines to the correct property when we come across them, but how do we do that? Keep in mind that these extra lines won't match on MONSTER_PROP_REGEX, so we can simply detect that non-match, make sure it's not an empty line, and add it to the special notes if it exists or the description if the special notes doesn't exist. Here's what that code looks like in add_property.
MONSTER_PROP_EXT_REGEX = /\S+(?:\s\S+)*/

# ...

add_property = lambda do |line, data|
props = line.scan(MONSTER_PROP_REGEX)
props.each do |prop|
if prop[0] == 'Default Passive' || prop[0] == 'Default Skill'
n = 1
n += 1 while data.last.has_key? (prop[0] + n.to_s)
prop[0] += n.to_s
end
data.last[prop[0]] = prop[1]
end
return new_monster, data if line.include? MONSTER_SEPARATOR

ext_line_match = MONSTER_PROP_EXT_REGEX.match(line)
if props.empty? and ext_line_match
if data.last.key? 'Special Notes'
data.last['Special Notes'] += ' ' + ext_line_match[0]
else
data.last['Description'] += ' ' + ext_line_match[0]
end
end

return add_property, data
end
By putting the extra code after the return if the line is the MONSTER_SEPARATOR, we can assume that this line is not the MONSTER_SEPARATOR and just check if the MONSTER_PROP_REGEX didn't match and there's something on the line. Then decide on which property to add the line to, and we're good to go.

Okay, that was a lot of stuff, so let's review. First, we read in the file that we wanted to parse that contains most of the monster taming data we need. Then, we loop through the lines of the file, feeding them into a FSM in order to find the section of the file where the list of monsters is and separate each monster's properties into its own group. Finally, we use a few simple regex patterns to capture each monster's property name-value pairs and add them to a list of hashes that will be fairly easy to print out to a .csv file later. All of this was done in 66 lines of Ruby code! Here's the program in full so we can see how it all fits together:
SECTION_TAG = "MLTameV"
MONSTER_SEPARATOR = "........................................"
NEXT_SECTION_TAG = "SpecMon"
NEW_MONSTER_REGEX = /MONSTER\s\d{3}/
MONSTER_PROP_REGEX = /(\w[\w\s\.]*\w)-*:\s(\S+(?:\s\S+)*)/
MONSTER_PROP_EXT_REGEX = /\S+(?:\s\S+)*/

find_separator = nil
new_monster = nil

end_monsters = lambda do |line, data|
return end_monsters, data
end

add_property = lambda do |line, data|
props = line.scan(MONSTER_PROP_REGEX)
props.each do |prop|
if prop[0] == 'Default Passive' || prop[0] == 'Default Skill'
n = 1
n += 1 while data.last.has_key? (prop[0] + n.to_s)
prop[0] += n.to_s
end
data.last[prop[0]] = prop[1]
end
return new_monster, data if line.include? MONSTER_SEPARATOR

ext_line_match = MONSTER_PROP_EXT_REGEX.match(line)
if props.empty? and ext_line_match
if data.last.key? 'Special Notes'
data.last['Special Notes'] += ' ' + ext_line_match[0]
else
data.last['Description'] += ' ' + ext_line_match[0]
end
end

return add_property, data
end

new_monster = lambda do |line, data|
if NEW_MONSTER_REGEX =~ line
return add_property, data << {}
elsif line.include? NEXT_SECTION_TAG
return end_monsters, data
end
return new_monster, data
end

find_separator = lambda do |line, data|
if line.include? MONSTER_SEPARATOR
return new_monster, data
end
return find_separator, data
end

section_tag_found = lambda do |line, data|
if line.include? SECTION_TAG
return find_separator, data
end
return section_tag_found, data
end

start = lambda do |line, data|
if line.include? SECTION_TAG
return section_tag_found, data
end
return start, data
end

next_state = start
data = []
File.foreach("ffiii2_monster_taming_faq.txt") do |line|
next_state, data = next_state.(line, data)
end
And here's the corresponding FSM diagram:

Final FSM diagram of tamable monster parser

We still need to write the collected data out to a .csv file so that we can import it into a database, but that is a task for next time. Also, notice that we have done almost no data integrity checks on this input other than what the FSM and regex patterns inherently provide. Any mistakes, typos, or unexpected text in the file will likely result in missing or corrupt data, so we'll need to do some checks on the data as well. Additionally, this data is just the tamable monster data. We still need the other table data for abilities, game areas, monster materials, and monster characteristics. However, this is a great start on the data that was the most difficult to get, and we ended up with quite a few extra properties that we weren't intending to collect in the list. That's okay, I'm sure we'll find a use for them.

Monday, September 21, 2020

CA 283, Z-Tack!

Hi there, I hope that you are all safe and staying home if you can. I know in many cases that is more difficult, a lot of my friends have to work from home while home schooling their kids, which I imagine is a lot. We will get through this! One thing that may or may not help with that is Z-Tack by Bomb, the super rare ripoff of a PAL game called Base Attack. I was kind of surprised that I got so much feedback for this game, thank you so much. Next time I'll be covering a big game, Pole Position by Atari. If you have any thoughts on this game, please send it to 2600gamebygame@gmail.com by April 12th. I think there will be a lot of feedback for that one too. As always, I thank you so much for listening and I wish you all health and happiness.

Z-Tack on Random Terrain
Atari Age thread on Bomb and Bondwell
Wilson Oyama's Z-Tack high score video
Perry Rhodan thread on Atari Age
Perry Rhodan Manifest B picture
ITT Cosmic Town

Saturday, September 12, 2020

Gaslands And Kill Team

Those are the two projects I am spending my time on right now.

Oh, and I am doing fine, just incredibly busy. Dealing with a lot of things, but its improving, if you are worried about me. And if you are, well... thanks. I appreciate it.

All Aboard The S.S. Anne!

My first morning in Vermilion City, I found myself down at the docks pushing my way through the crowds. Vermilion Port was easily the busiest place I'd ever been in my life up to that point. The sheer number of ships and trucks moving goods in and out of the Kanto region was overwhelming. Even still, the S.S. Anne stood out of the crowd as a majestic ocean liner built for luxurious and excessive lifestyles. It's glorious, gleaming white hull was a beacon you could see almost anywhere in Vermilion City. I'd had my eye on her since I came into town the night before and I had no trouble finding my way to the pier at which she was docked. Getting on to that pier without a ticket or an invitation to the tournament was a trial all its own. I spent most of the morning looking for a way past security.
The story of how I got aboard the S.S. Anne is a story of chance encounters and dumb luck. The first of which was a man fishing off the end of an unused pier. I was attempting to get a better vantage point of the S.S. Anne at the time, but I was also curious about the old fisherman. I sat with him a moment and he showed me how he supported himself just fishing up Pokémon out of the Vermilion Bay. After spending perhaps half an hour watching and listening to his old fish tales, he offered me one of his old rods that he wasn't too attached to. I was surprised at his generosity and thanked him graciously. He said the old rod wasn't great at pulling up any big catches, but it was a good starter rod to learn how to handle myself. I was eager to try it out.
There didn't seem to be any restrictions posted on where you were allowed to fish in Vermilion Port, so I plopped myself down right at the edge of the S.S.Anne pier. I cast my line into the waters and waited. Patiently. For a long time. As I sat there on the edge of the dock, I could hear battles going on the deck above me. I could hear the whoops and cheers of the gathered crowds as local trainers, decadent cruise passengers, and members of the crew fought for fun and money. I knew that as long as there were trainers ready to battle, the registration for this exhibition would be open, but I had to get aboard soon.
There was a tug on the line! A new type of Pokémon battle had begun. It was my strength and determination against that of whatever was on the other end of that line. I struggled for several minutes, worried that this old rod would snap clear in half at the tension on the line. Finally, a red scaled fish Pokémon lurched out of the water and flopped on to the pier. I frowned slightly. It was a Magikarp. I should have known. It was too weak to weaken, so I had Arnold put it to sleep and I carefully tried to get it into a Pokéball. The damn thing casually slapped 4 of my balls into the ocean in its fitful slumber before finally being secured in the 5th ball. I named him Royal, and although he was weak now, I had some big dreams for Royal in the distant future.
I had no idea at the time, but the entire Magikarp episode was being watched by a gentleman nearby. I called out Royal to get a good look at him and size up his potential - which admittedly was limited right now. As I was gazing down at him, a firm hand clasped my shoulder.
"I say, good show, old sport. Good show."
"Thank you," I managed to sputter in sudden confusion.
"Oh, I daresay, where are my manners? My name is Reginald and I'm the Chairman of the Pokémon Fan Club. We are headquartered right here in Vermilion City! I have personally collected over 100 Pokémon and I'm very fussy when it comes to Pokémon. I see you are less fussy and I admire your spirit, old sport." He motioned to Royal. "I could never bother myself with Pokémon like that, but there is something special about you. Come now, join me aboard the S.S. Anne, would you? I can see you are itching to join the tournament. Meanwhile, let me tell you all about my favorite Pokémon, Rapidash. It is the most spectacular and ravishing of all the Pokémon, don't you agree?"
All I really heard was "join me aboard the S.S. Anne" and I was packing up my belongings as quickly as I could. While Chairman Reginald prattled on and on about Rapidash, my attention was mainly focused on shoving the old rod into my backpack, and making sure my Boulder and Cascade Badges were clearly visible. I wanted everyone to know how far I'd come as we made our way on board the cruise ship.

Once aboard, I listened to Chairmain Reginald talk about Rapidash for what felt like an eternity a polite amount of time considering the great favor he'd just done for me. Eventually I excused myself and I found my way to the registration desk. I showed off my two badges and was put into a mid-level bracket. The tournament was scored on a point system where trainers lost the most points when their Pokémon fainted, and since I was determined not to allow them to faint I was sure to score very highly in the preliminary matches.
All the matches were happening along the promenade deck with spectators above able to look down into most of the arenas that were setup. As I stood along the promenade, it was crowded and difficult to see much, but I managed to push my way toward my first match-up near the aft of the ship. I was going to face off against an older gentlemen who happened to be a passenger aboard the cruise wanting to test his skill against the Kanto trainers. I was nervous, but also excited. He opened with a Growlithe - a Pokémon I'd never seen before. It was obviously a fire-type and so Douglas was the right choice. He needed the battle experience, as well.
Growlithe was faster than I anticipated! He landed a desperate attack on Douglas's head which nearly incapacitated him. I was shocked. I'd almost lost a Pokémon due to my overconfidence in type match-ups. I switched out Douglas for Rascal Jr. hoping to get the edge in speed. My swap paid off because Rascal Jr. landed a monstrous hyper fang on this Growlithe and knocked it completely out. The crowd went wild at this turn around and I remember how uplifting it made me feel. I couldn't help from smiling like a fool.
The passenger tossed out another Growlithe who met the same OHKO fate to the power of Rascal Jr. To punctuate just how amazing Rascal's victory over the Growlithe duo actually was, Rascal Jr. evolved into a Raticate in front of the entire crowd. It generated some hushed awe from the spectators, but I was just ecstatic to see Rascal Jr. grow in power. Rascal and I were victorious in our first match, but there were still several more ahead of us before we'd meet with the captain.

Current Team:
Attacks in Blue are recently learned.

Bill's Storage: Shakespear (Spearow) & Royal (Magikarp)

Old Man Daycare: Charlie (Pidgey)

Friday, September 4, 2020

WIP: Lancers

September has been a fairly hopeless month in terms of gaming, painting, and blogging I'm afraid. So, just in case you thought I'd jacked it all in I'll put up some pics of the Austrian lancers I don't seem to be able to finish. 
Elite figures and horses with a few mounts from elsewhere (Connoisseur, Alban, Firing Line). 
Bases obviously not done yet, still awaiting painting, brushing and grass bits. So far I've just done 32 out of what will be a massive 48 man regt - 8 squadrons of 6 figures. I picked the the third regt as I liked the red Czapka, plus the trumpeters apparently wore white ( though I've had trouble confirming this). Plenty of conversions and head twists, plus a few replacement heads from Firing Line. Lance pennons by GMB. There will be a standard bearer, although I'm not sure if Austrian light cavalry actually carried them in action. All the lances were soldered, and the officers sabres replaced. I also played about with some of the horses, teasing out manes and tails with the soldering iron to give them more movement. In the end, however, I decided life was too short. I might do this again for officers and the odd special, but otherwise.No. 
I hope to get these finished this week, I guess I've had a bit of mid-project blues with the old Austrians. It will pass.
I have also decided to give these chaps their own staff officer - seeing as they are such a big unit. I found a lovely Bicorne Uhlan officer, and I've tweaked him a bit- changed his sword arm, added a steel sabre and soldered a "flying" scabard onto him, again to impart a little movement. I'll post him when he is done. 
Free Web Site Counter

Monday, August 31, 2020

15 Hidden Android Features You Should Know

While Android has matured by leaps and bounds, it's still going through the refinement phase. Over time, Google has both added and removed many popular features in Android. Sometimes the features are completely removed. However, in many cases, they make it to the Settings page or they are buried under different hidden places inside Android. That's why we have come up with this article where we unearth 15 hidden Android features that are quite interesting and helpful. So, let's go ahead and explore some unique Android features which are available on our Android devices.


Hidden Android Features

Here, we have mentioned several hidden Android features ranging from privacy, security, ease of use and more. Further, we have also added some obscure Android features which were released recently but might have gone under the radar. Now with that said, here are the hidden Android features that you should know and use often.

1. Block Spam Calls

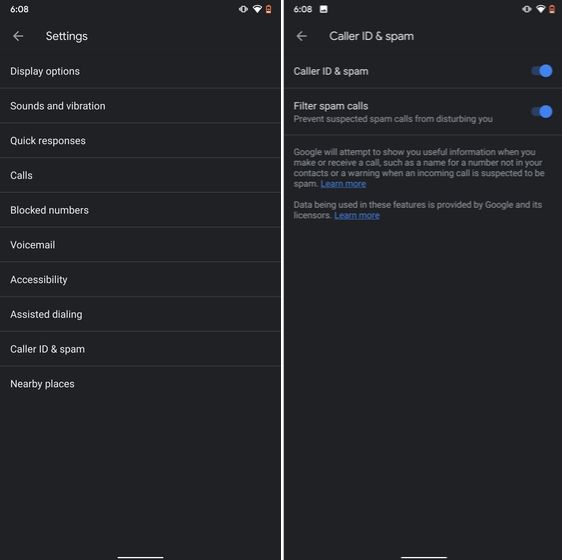
The one feature that I turn on whenever I set up a new Android device is: filter spam calls. It saves me from unwanted calls by telemarketers, fraudsters and spammers. If you use a stock Android device, you must have the Phone app by Google installed as your default dialer. To enable spam call blocking, open the Phone app and tap on the three-dot menu on the top-right corner and open Settings. After that, open "Caller ID and spam" and enable both the toggles. Now, whenever you will receive a call by spammers, the screen won't light up or make any sound. It's almost like DND with Total Silence turned on.

1. Block Spam Calls hidden android features

If you are worried that you will miss important calls then fret not. I have been using this feature for a long time and I can vouch that it works flawlessly. While there are other apps like Truecaller with similar features, you should be wary against handing your data to third-party apps, especially given its shady past record.

2. Verification Code Autofill

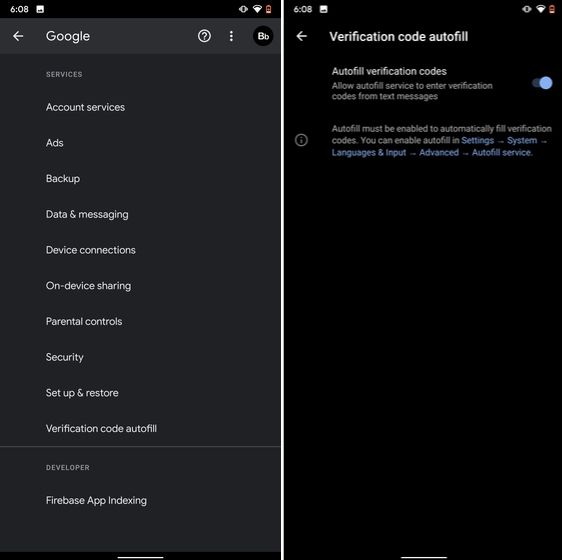
Many of us have allowed SMS permission to multiple apps for seamless OTP verification. However, this can lead to serious breach as apps can read all your text messages and also build credit profile without your consent. To crack down on this behavior, Google has brought a new API called the SMS Retriever. It allows apps to capture a one-time code without asking for SMS permission. In case, the app developer has not implemented this API, Google will act as a bridge and provide the verification code. That is awesome, right? So to enable this feature, navigate to Settings -> Google -> Verification Code Autofill and enable the toggle. Make sure you have also enabled the Autofill service by Google.

2. Verification Code Autofill

3. Force Dark Mode on all Apps

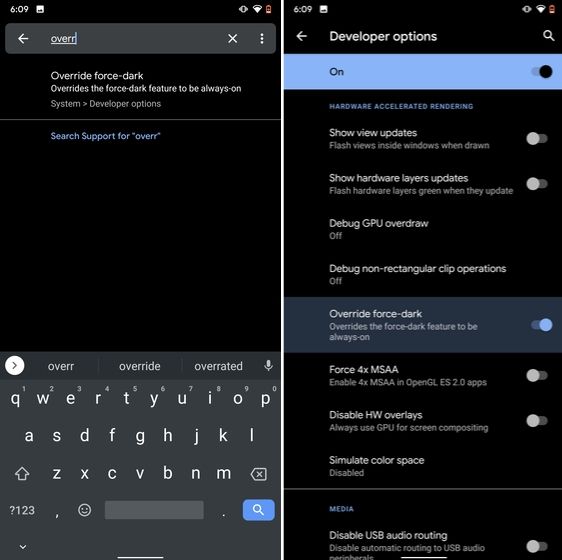
While the dark mode is slowly becoming the norm, there are still apps like Facebook and WhatsApp which are yet to embrace the dark side. If you want to force dark mode on a range of apps then there is a hidden Android setting that lets you do it. However, you must be on the latest Android 10 build. To enable dark mode for all the apps, navigate to Settings -> About Phone and tap on the Build Number for seven times continuously. A toast notification will show up prompting "Developer Options have been enabled". Now go back, and search for "Override force-dark" in the Settings page. Tap on the first result and then enable the toggle. Just to be sure, restart your device and check if dark mode is working on all apps.

3. Force Dark Mode on all Apps

4. Focus Mode

Google has brought a new feature called Focus Mode to Digital Wellbeing with the launch of Android 10. While Digital Wellbeing is great at limiting the screen time of various apps, Focus Mode allows you to block certain apps completely so you can focus on what you are doing. To configure Focus Mode, follow Settings -> Digital Wellbeing -> Focus Mode. Here, you can select apps that you find distracting and can enable Focus Mode straight from the Quick Settings panel.

4. Focus Mode hidden android features

5. Share WiFi with QR Code

I know the feeling when someone asks you to share your WiFi's password and you can't seem to remember it. If you use a strong password with multiple hashes and characters then it becomes even more tedious to type it out. In such cases, a QR code can help you seamlessly connect to WiFi networks. Thankfully, Android 10 has this not-so-hidden feature under the WiFi Settings page. Open it and you will find the QR code scanner besides the "Add Network" section. Now, scan the QR code and you will be connected in no time.

5. Share WiFi with QR Code

6. Randomize MAC Address

MAC address is a unique identifier assigned to WiFi-enabled devices including smartphones. Most devices come with a static MAC which can be exploited and used for tracking user movement. So having a random MAC address reduces the chance of tracking and strengthens your privacy. If you are running Android 10 then you can randomize the MAC address from the WiFi Settings page. Tap on the WiFi that you are connected to and open "Privacy". Here, make sure "Use randomized MAC" is your default pick.

6. Randomize MAC Address

7. Force Apps to Resize in Split Mode

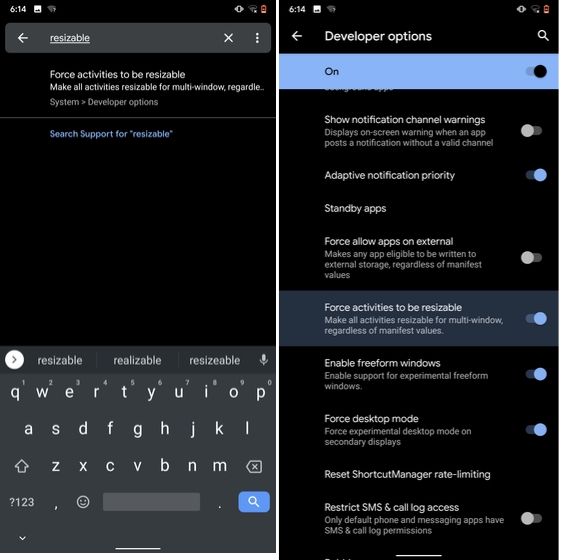
Android has some unique features like Split Mode which make it quite distinct from iOS. It lets you run two apps at once so you can effortlessly multitask between them. However, not all apps support Split Mode and that's where this hidden Android feature comes into play. With this feature, you can force any app to resize in split mode, irrespective of the app compatibility. So to enable this feature, open Settings and search for "resizable". Open the first result and enable "Force activities to be resizable". Now, restart your device and you can enjoy any app in the Split mode.

7. Force Apps to Resize in Split Mode

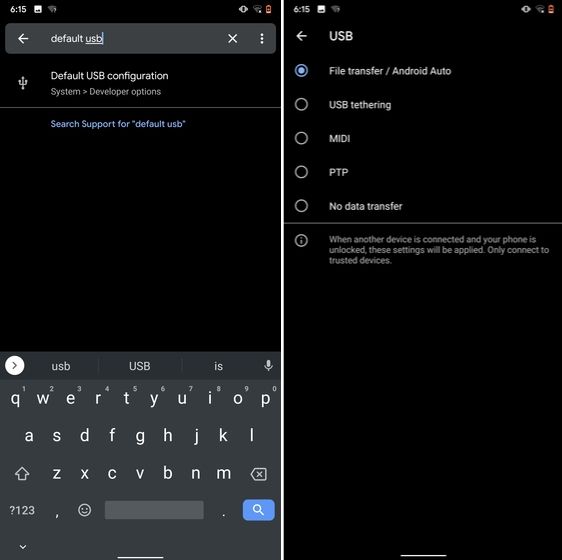
8. Default USB Configuration

If you are someone who regularly connects Android devices to PC then this sneaky feature is going to help you a lot. Android 10 now allows you to choose your default USB configuration. If you transfer files regularly then simply choose the desired settings and you are good to go. To configure USB, open Settings and search for "Default USB" and tap on the first result. Here, choose "File transfer" or any other settings based on your preference.

8. Default USB Configuration (2) hidden android features

9. Private DNS

While Private DNS was launched with Android Pie, it still remains one of the least talked features of Android. It allows you to encrypt your DNS query so no one can read it, not even your internet service provider. You can find the Private DNS feature in the "Network and Internet" settings page. Here, open "Private DNS" and choose Automatic for Google's DNS or you can also select some other DNS providers as well. I would recommend you to go with Cloudflare's DNS.

9. Private DNS

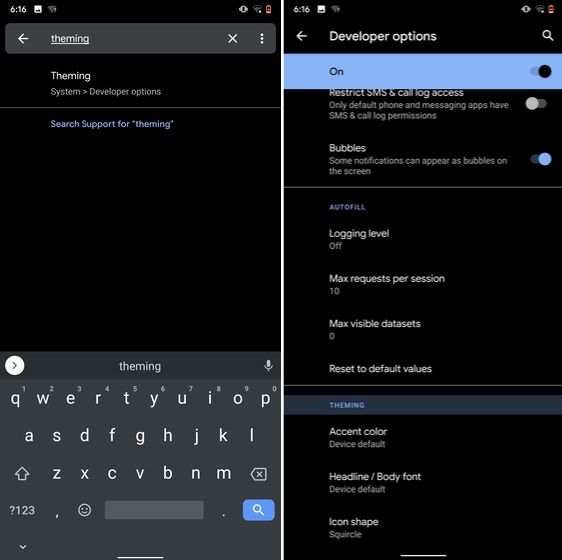
10. Device Theming

Device theming has finally arrived on Android, but it's still hidden under the developer options. You can change the accent color, font and icon shape from a handful of options. To find the desired settings page, open Settings and search for "theming". Tap on the top result and customize your Android device as you prefer.

10. Device Theming

11. Show Taps While Screen Recording

With the release of Android Oreo, Google removed the ability to show taps while screen recording for security reasons. However, the settings to configure taps is still available and hidden under the developer options. Just open the Settings page and search for "taps". Open the first result and enable the toggle. Now, you can record your screen with taps and that's really convenient.

11. Show Taps While Screen Recording hidden android features

12. Capitalize Words Quickly

If you want to capitalize words quickly then Gboard has this nifty feature which is super helpful and I simply love it. Just select the words and tap the "Shift" button twice to capitalize a chunk of words at once. You can also make it lowercase by similarly double tapping the shift button. And if you just want to keep the initials capital then tap the shift button once. That's pretty great, right? So go ahead and type hassle-free with Gboard.

Capitalize Words Quickly

13. Uninstall Multiple Apps

One of the best hidden Android features is that you can uninstall multiple apps at once. It works on older versions of Android as well so that is great. All you have to do is open the Google Play Store and tap on the hamburger menu and select "My apps and games". Here, switch to the "Installed" section and then tap on "Storage". After that, simply select apps that you want to uninstall and hit that "Free Up" button. Voila, multiple apps just got uninstalled in just one tap.

13. Uninstall Multiple Apps

14. Clear Site Storage Using Chrome

Chrome is notorious for accumulating a large amount of data in background which makes the performance worse and also takes up crucial storage space. If you want to check what websites are eating up your memory space then a hidden Chrome setting can help you with that. Open Chrome on your Android device and head over to its Settings page. Now, navigate to Site Settings and open Storage. Here, you will find all the websites with their storage space. Open any website and tap on the "Delete" icon to finally free up your internal storage from unnecessary cached data.

14. Clear Site Storage Using Chrome

15. Street View Layer in Google Maps

Street View is an immersive way to explore places and find new landmarks, hotels, restaurants from anywhere around the world. Now, the Street View Layer has been added to Google Maps and it works pretty well. To check if Street View is available in your region, open Google Maps and tap on the "layer" icon on the top-right corner. Now, tap on "Street View" icon and then zoom out to find blue lines on the map. Finally, tap on the blue lines and Street View will show up for that place. That's cool, right? So go ahead and check out Street View to find some hidden gems around the world.

15. Street View Layer in Google Maps hidden android features

Note: The blue lines show up wherever street view is available.

@EVERYTHING NT

Continue reading


  1. New Hacker Tools
  2. Pentest Tools Free
  3. Best Hacking Tools 2020
  4. Hacking Tools 2019
  5. What Are Hacking Tools
  6. What Are Hacking Tools
  7. Hacker Techniques Tools And Incident Handling
  8. Hack Tools Online
  9. What Are Hacking Tools
  10. Hack Tools 2019
  11. Hackrf Tools
  12. Pentest Tools Website Vulnerability
  13. Hacker Search Tools
  14. Hak5 Tools
  15. Hacker Tools For Windows
  16. Tools Used For Hacking
  17. Pentest Tools For Windows
  18. Hack Tools
  19. Hacking Tools Usb
  20. Android Hack Tools Github
  21. Wifi Hacker Tools For Windows
  22. Hacker Tools
  23. Pentest Tools List
  24. Pentest Tools Free
  25. Pentest Tools Android
  26. Hack Tools For Pc
  27. Tools 4 Hack
  28. Top Pentest Tools
  29. Hacker Tools Online
  30. Hacking Tools 2019
  31. Android Hack Tools Github
  32. Pentest Tools Bluekeep
  33. Hack Tools For Windows
  34. Hack Tools
  35. Bluetooth Hacking Tools Kali
  36. Hack Tools Pc
  37. Hackers Toolbox
  38. Hacking Tools Hardware
  39. Hack Tools For Mac
  40. Hacking Tools Usb
  41. Hacker Techniques Tools And Incident Handling
  42. What Is Hacking Tools
  43. Top Pentest Tools
  44. Hacker Security Tools
  45. Hacking Tools Kit
  46. World No 1 Hacker Software
  47. Ethical Hacker Tools
  48. Hacking Tools Github
  49. Pentest Reporting Tools
  50. Hacker Tools For Windows
  51. What Are Hacking Tools
  52. Hacker Tools Mac
  53. Hack Tools 2019
  54. Tools 4 Hack
  55. Hacking Tools
  56. Wifi Hacker Tools For Windows
  57. Pentest Tools Framework
  58. Best Pentesting Tools 2018
  59. Pentest Tools Tcp Port Scanner
  60. Hack Tools For Pc
  61. Hacking Tools For Kali Linux
  62. Hacking Tools Github
  63. Hack Tools Pc
  64. Pentest Tools Alternative
  65. Pentest Tools List
  66. Hacking Tools Github
  67. Hack Tools For Windows
  68. Hack Tools For Pc
  69. Pentest Tools Find Subdomains
  70. Hacking Tools Kit
  71. Tools Used For Hacking
  72. Hacker Tools 2019
  73. Hack Tools
  74. Hacking Tools Mac
  75. Kik Hack Tools
  76. Hacking Tools And Software
  77. Hacking Tools Usb
  78. Hack Tool Apk No Root
  79. Hacker Tools Linux
  80. Pentest Tools Review
  81. Hack Tools Online
  82. Pentest Tools Download
  83. Top Pentest Tools
  84. Hacking Tools Windows
  85. Tools For Hacker
  86. Hacker Tools Github
  87. Pentest Tools Linux
  88. Pentest Tools Bluekeep
  89. Pentest Tools Apk

Sunday, August 30, 2020

AutoNSE - Massive NSE (Nmap Scripting Engine) AutoSploit And AutoScanner


Massive NSE (Nmap Scripting Engine) AutoSploit and AutoScanner. The Nmap Scripting Engine (NSE) is one of Nmap's most powerful and flexible features. It allows users to write (and share) simple scripts (using the Lua programming language ) to automate a wide variety of networking tasks. Those scripts are executed in parallel with the speed and efficiency you expect from Nmap. Users can rely on the growing and diverse set of scripts distributed with Nmap, or write their own to meet custom needs. For more informations https://nmap.org/book/man-nse.html

Installation
$ git clone https://github.com/m4ll0k/AutoNSE.git
$ cd AutoNSE
$ bash autonse.sh

Exmaples
$ bash autonse.sh


Continue reading
  1. Pentest Tools Linux
  2. Hack Tools Pc
  3. Hacker Tools For Mac
  4. Pentest Tools Bluekeep
  5. Wifi Hacker Tools For Windows
  6. Hack Tools For Pc
  7. Hacking Tools Download
  8. How To Hack
  9. Hack Rom Tools
  10. Android Hack Tools Github
  11. Hacking Tools For Windows 7
  12. Hacker Tools For Mac
  13. Hackers Toolbox
  14. Pentest Automation Tools
  15. Tools For Hacker
  16. Beginner Hacker Tools
  17. Hacking Tools For Beginners
  18. Best Hacking Tools 2020
  19. Pentest Tools Website Vulnerability
  20. Hacker Tools Hardware
  21. What Are Hacking Tools
  22. Pentest Tools For Ubuntu
  23. What Are Hacking Tools
  24. Free Pentest Tools For Windows
  25. Beginner Hacker Tools
  26. Ethical Hacker Tools
  27. Pentest Tools Tcp Port Scanner
  28. Pentest Tools Linux
  29. Hacking Tools Github
  30. Hack Tools
  31. Hack Tools For Mac
  32. Hacker Tools Free
  33. Kik Hack Tools
  34. Best Hacking Tools 2020
  35. Hacker Tools Free
  36. World No 1 Hacker Software
  37. Hackers Toolbox
  38. Hacking Tools Download
  39. Free Pentest Tools For Windows
  40. Hacking Tools Github
  41. New Hack Tools
  42. Pentest Tools Port Scanner
  43. Hacking Tools For Windows
  44. Hacking Tools Software
  45. Tools Used For Hacking
  46. Install Pentest Tools Ubuntu
  47. Hacking Tools Mac
  48. Pentest Tools Online
  49. Hacker Tools Windows
  50. Pentest Tools Tcp Port Scanner
  51. New Hacker Tools
  52. Hacking Tools Hardware
  53. Hacker Tools List
  54. Hacker
  55. Pentest Tools Alternative
  56. Pentest Tools Url Fuzzer
  57. Hacking Tools For Windows Free Download
  58. Hacking Tools 2019
  59. Hak5 Tools
  60. How To Install Pentest Tools In Ubuntu
  61. Pentest Tools Download
  62. Android Hack Tools Github
  63. Hacking Tools Windows
  64. Hacking Tools Free Download
  65. Tools 4 Hack
  66. Hacker Tools Apk Download
  67. Hacking Tools For Games
  68. Hacking Tools Pc
  69. Hacking Tools For Mac
  70. Hacker Tools
  71. Hacking Tools Windows
  72. Hacking Tools Hardware
  73. Pentest Tools Website Vulnerability
  74. Hack Tools For Games
  75. Hack And Tools
  76. Best Hacking Tools 2019
  77. Pentest Reporting Tools
  78. Growth Hacker Tools
  79. Top Pentest Tools
  80. Hacker Search Tools
  81. Bluetooth Hacking Tools Kali
  82. Pentest Tools Find Subdomains
  83. Hacking Tools Windows
  84. Hack Tool Apk
  85. Pentest Tools Website Vulnerability
  86. How To Make Hacking Tools
  87. Pentest Tools Review